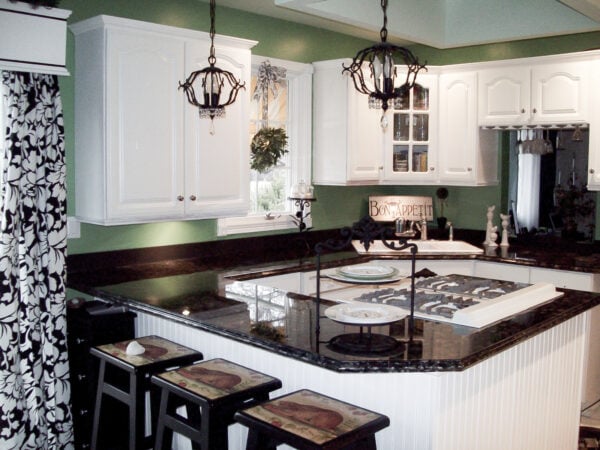
Painted Formica Countertop


Well I came upon this group of people at ThriftyFun dot com who had PAINTED their laminate countertop to look like granite. Yes, I said painted! I was VERY apprehensive about painted countertops and undertaking such a drastic measure; however, as I looked at the leprechaun green color complete with honey pine trim and shiny brass knobs which only added to their “splendor”, I thought how much worse can it be?!?
Ok, so you can see the before and after pictures, but what about the dreaded “in-between”?? LOL The cost was about $115 for all the countertops and I still have one box left for the backsplashes.
This post contains affiliate links. Learn more and read our full disclosure policy here.
HOW TO PAINT FORMICA COUNTERTOPS DIY
Supplies:
- Painters tape
- Paint foam roller and paint tray- this is my favorite kind for a smooth finish
- Drop cloths (I also used newspaper too)
- Filler for any holes or scrapes
- 150-grit Sandpaper
- Proper ventilation mask
- Bonding primer putty
- Base Coat Paint (I tried black spray paint- but don’t!!)
- Texture paint (silver)
- Natural Sea Sponge
- Glitter for shine
- Epoxy topcoat (sealer)
- Heat gun/ blowtorch
1. Prepare Your Space
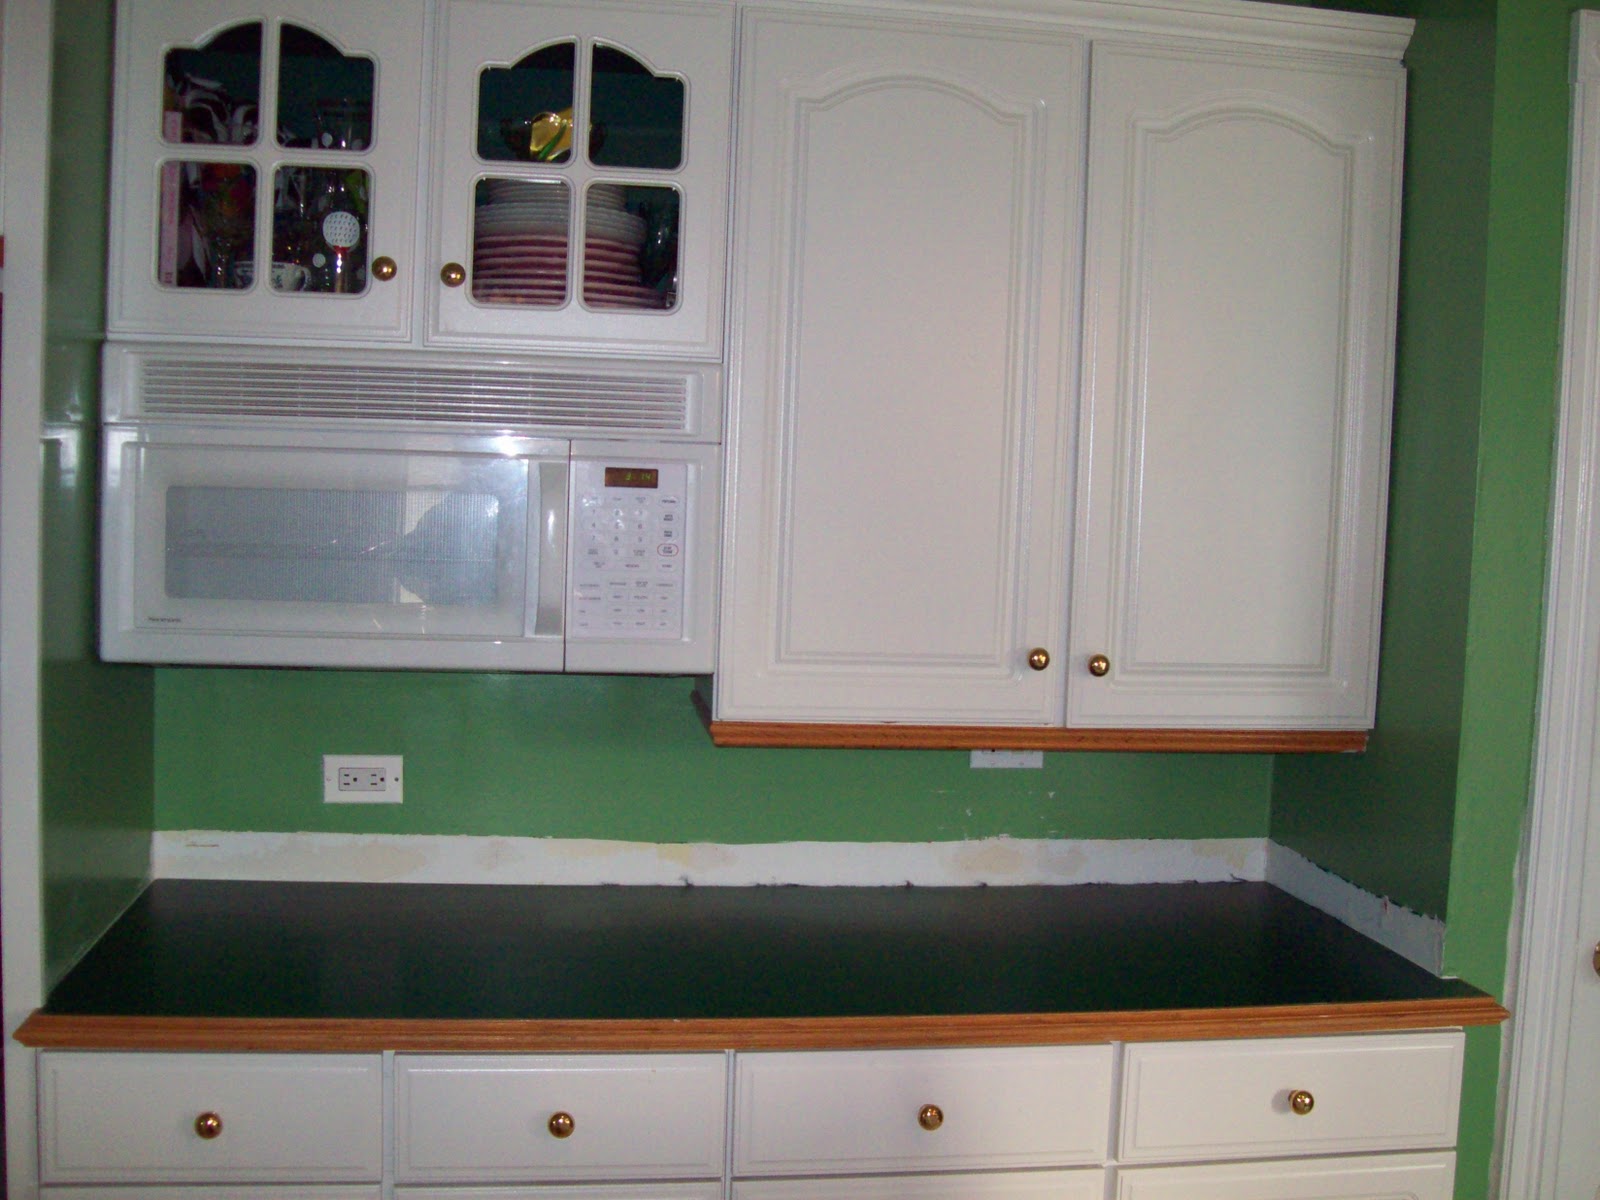
Firstly, I removed the wood backsplash and washed down the countertops so they were very clean. It is a good idea to use a rubbing alcohol or ammonia to remove any grease and all buildup on your countertops.
Now is the time to to cover and protect your cabinets, sink, stove edges etc. Using Painters tape, tape off all edges, and cover all surfaces around countertops to protect the cabinets from drips overspray etc.
2. Prep the Countertops
Depending on the state of your old countertops you may need to fill any holes or scratches that you find. After the filler is dry now is the time to sand your counters, to help the paint adhere. Be sure to use proper masks. After sanding wipe your surface thoroughly to make sure you don’t have any dust or dirt that will interfere with adhesion of paint.
Caulk any cracks if you have removed the backsplash (so epoxy doesn’t leak behind or into the back of your cabinets)
3. Prime
Then I simply used a small sponge roller and painted on a white bonding primer which I made gray by mixing in black paint. Here is a picture of the gray primer just rolled on.

4. Base Coat of Paint
Next add your base coat paint. (If you want paint kits, check out this post), this will be the main background color. I simply bought a quart of Rustoleum flat black paint and used my paint roller for the first coat and it was wonderful. If you need to add a second coat, do that now before adding the texture.

TIP: I made a mistake initially on this step; I covered the cabinets and everything in sight courtesy of the Chicago Tribune! I then had the brainiac idea that I would use stone texture spray paint! NEGATORY! It was awful. It worked for others but not for me. So I had to sand that off and begin again. Don’t try it! Spray painting in the kitchen… BAD IDEA!
5. Add Texturizing Paint for a Granite Look
For a granite look you need to add texture (we have a marble painted countertop version here) this adds a realistic granite look and some bling!
So, I purchased a can of metallic silver paint and a sea sponge and simply had some fun. I sponged on the silver and then sponged on the black over it and repeated this process until I had a granite look with a little bit of pop!
To help add shine, I took the Martha Stewart black glitter and sprinkled it everywhere while the paint was still a little tacky.
How awesome did this look – I was really getting excited that this just might work! Fingers crossed!

Just sponging on silver metallic paint – its almost impossible to mess up!
6 Adding the Topcoat Epoxy
Then came the final step which had me a little nervous. The final poly coat. I researched this quite extensively to make sure these chemicals could be around food and anything breathing. I am very conscious about chemicals, volatile organic compounds (vocs) and such due to my cancers.
Everything I read about Envirotek was wonderful. No problems and no risks. So, I bought a few boxes at HOBBY LOBBY with my 40% off coupon and was ready to go!

Envirotek and Martha Stewart Black Onyx Glitter – it’s like sugar dust!
Be sure to read the manufacturer’s instructions before starting so you have a clear understanding of what you need to to.
Be sure to check on your cabinet coverings and protections. I put plastic over the cabinets and cardboard on the floor. I mixed the two bottles and poured it on. Use disposable buckets and sponge brushes – you will throw everything away – even your clothes because it is so sticky.
It was actually kinda fun to move it around and then simply let it dry. I had my blowtorch ready to burst the little bubbles that can form and I only had to use it on a few. It was gorgeous and I knew it was still wet but I had no idea it look almost the same when it would cure completely dry and hard as a rock and so durable!!
I could not imagine so little effort and money could make SUCH a difference! I WISH I had thousands for real granite but I don’t! So this totally works for me! I love it and I still have to do my backsplashes but I know it can only get better!

Always cover cabinets – especially WHITE cabinets!
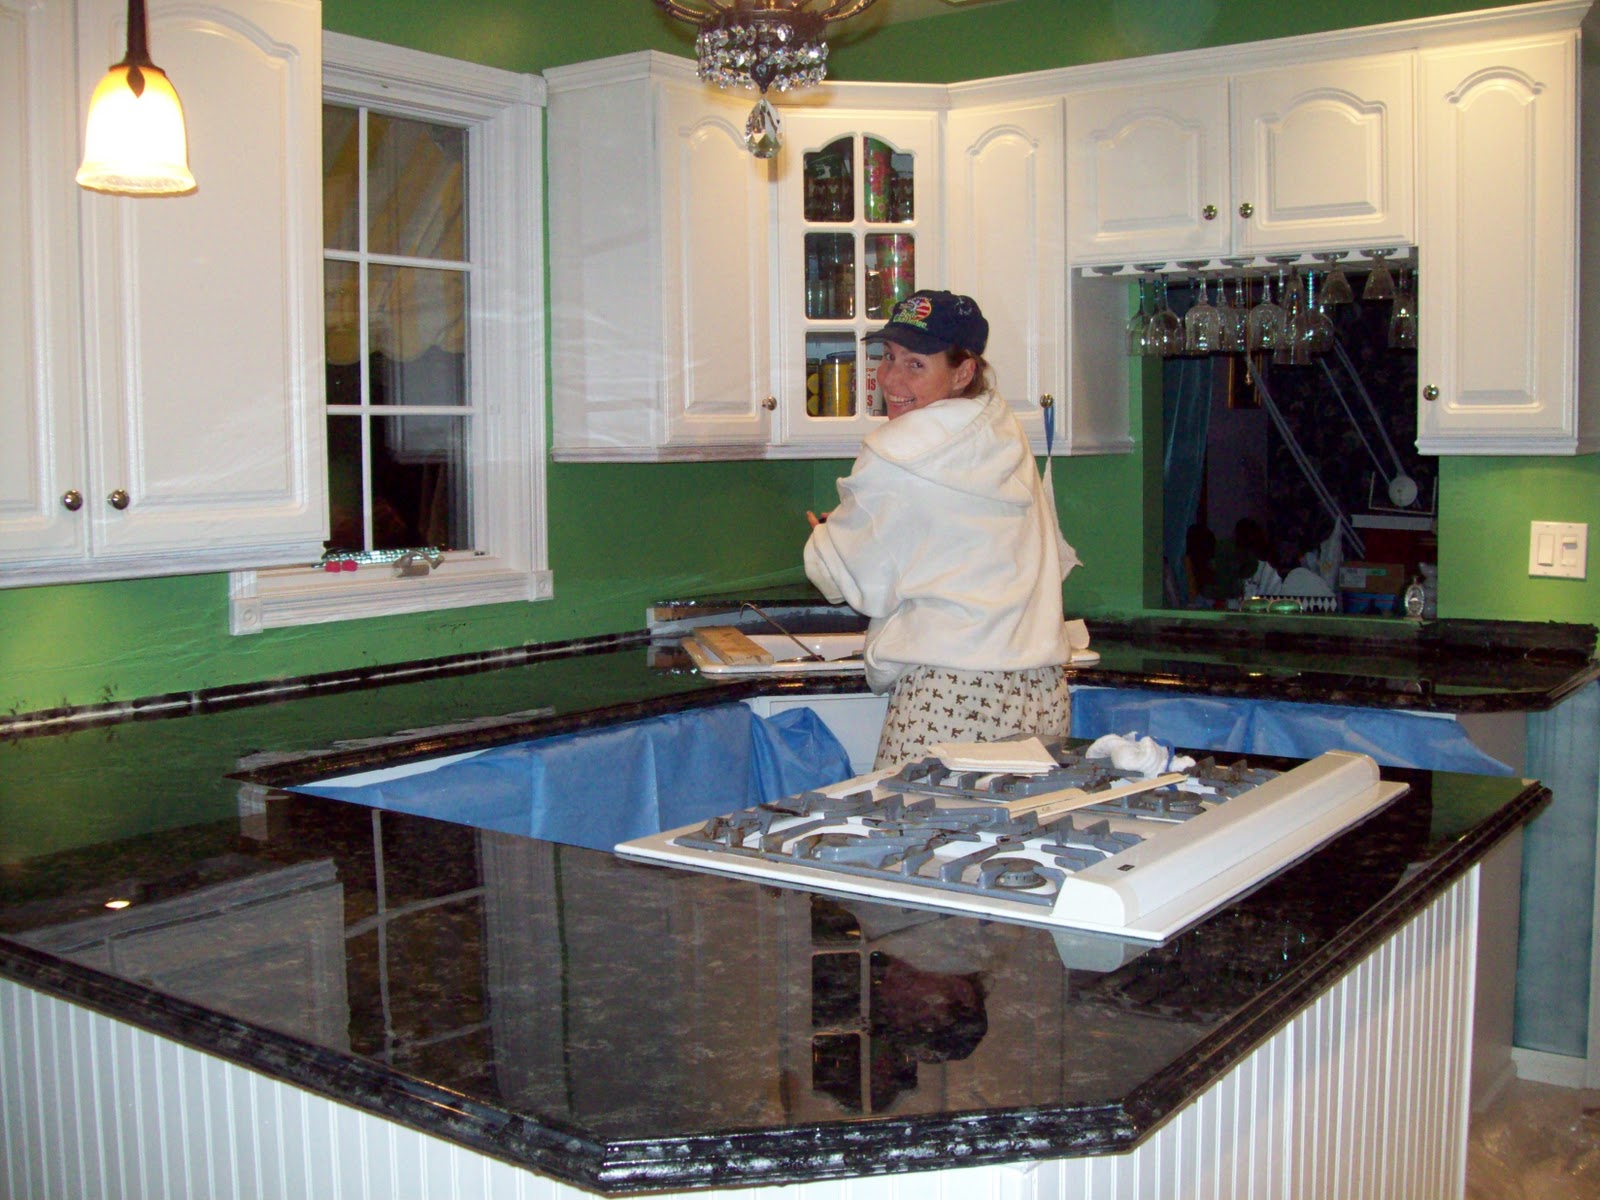
Finally finished at 3 o’clock in the morning. Takes about 24 hours to dry and about 3 days to completely set and cure.
Here are two more sets of BEFORE n AFTER pictures. This is the smaller counter which is the one with which I started because I thought it would be easier to experiment on being contained. (Actually, this area is not readily seen, so if it was a train wreck, it wouldn’t have been AS noticeable!) 🙂
I know there are two missing handles – I am still working on the hardware although I like these a lot!

I switched out the faucet and hardware for bright chrome and painted the wood trim to match the cabinet.

Try it! Do it! You won’t regret it! And you will be so proud of yourself when it turns out spectacular and people think it is real granite kitchen counter! That is the best part! 🙂
It is like any kitchen countertops and needs to be cared for. You cannot put hot pots on it and it can scratch but you simply have to use cutting boards and trivets like you would with real granite to protect it from stains, etc. If the scratches are deep you can always cover them with another coat. Good luck!
Cassity Kmetzsch started Remodelaholic after graduating from Utah State University with a degree in Interior Design. Remodelaholic is the place to share her love for knocking out walls, and building everything back up again to not only add function but beauty to her home. Together with her husband Justin, they have remodeled 6 homes and are working on a seventh. She is a mother of four amazing girls. Making a house a home is her favorite hobby.


Hi, just wondering how this has held up over time. Is there anything you would have done differently? Are you still glad you went with a high gloss finish? Looks great, thanks!!
Hi Elizabeth! This was a guest post, so if you’ll head over to the original blog (linked at the top of the post) then she can answer your questions. Thanks!
I have used a similar technique on laminate in several rental properties in the past. I used water based acrylic poly for the final topcoat. To make it durable it takes about three coats. It is clear and does not yellow with age. Another thing that I used for specks rather than glitter is intended for garage floors. Lowe’s stocks it in the paint department. It comes in a plastic container and it is sprinkled on top of wet paint used for garage floors. I used the same product on my counter tops and they look great. I noticed that several people mentioned their problems with glitter. After the layer with the specks is added, just sand and then finish coat.
I also have rental property that I own and would like to refinish the countertops. I have heard of Spreadstone Countertop refinishing kit by Daich Caotings. What is the best for tenant wear and tear countertop refinishing kit? Am I wasting my time using these products? Any advice would be appreciated. thanks
Hi, I used the Spreadstone on my kitchen about a year ago. I just completed using the Envirotex on by master bath with a double sink. I used oil based kills and then faux panted granite. Between the two I really have to say the faux granite with the envirotex looks better. The Spreadstone has a rough texture and we really sanded. It just does and even with the poly topcoat it looks rough. I told my husband last night that now we are going to have to get the gallon size (may need 2) and coat the Spreadstone so it really looks like granite.
Thanks for sharing your experience, Karen!
Wow! I can’t believe what a difference it has made! But how well does it do resisting heat? I host a lot of dinner parties and most of the time I have three to four hot trays on my counter at a time. I would love to update my counter tops but I’m still a little skeptical about how it would react to heat. Any advice for a skeptic like me? Thanks!
Hi Rae, Since this was from a guest blgoger and these aren’t my countertops, I can’t give you a great answer to your question. I’ve heard mixed reviews based on the different sealers that people have used — but in general, it’s good to protect your countertops from heat, no matter what they are made of or refinished with. You can click over to the original author’s blog (linked up toward the top of the post) and ask there, though.
This looks absolutely amazing! I have a question though – how did you apply the envirotex to the edges of the countertop? It seems like it could be messy or spill or drip, or simply be uneven.
I’m researching this for myself, as we bought a house with avocado colored laminate covered counters in our kitchen! But the edge of our counter is 90 degrees.
Thank you so much for your response!
How long has it stayed beautiful?
I absolutely love it! I have seen other painting tutorials however this one seems to be the easiest with beautiful results. I am most definitely going to do this. Thanks so much!
I’m following this as a guide and getting ready to do the Envirotex step. How did you do the back splashes? Did you paint them first, then install? Mine are built-in, one piece for the whole counter and backsplash. I imagine it’ll run down the vertical surface and be pretty thin there, while thicker on the horizontal surfaces. Suggestions?
An inexpensive update for laminate is to use chalk paint, then seal with several coats of poly acrylic sealer. We did this in 2 bathrooms that do not get a lot of use……definitely worth doing as a temporary fix!
Great idea! Thanks for the comment, Beverly!