DIY Baby Changing Table Topper


Build this easy DIY changing table topper for a dresser or or cubby shelf to hold a changing pad tray and organize diapers, wipes, and more.
As you prep for baby, be sure to get these easy printable pregnancy and baby milestone cards and check out our favorite baby-friendly decor ideas.

DIY Changing Table + Topper
Awhile back, we showed you how we built this mid-century inspired entry table with cubby storage.
It looks great there in our entryway, but we designed and have been using it as a dresser and changing table for our babies. (Yes, we have 2 little ones now! We love our growing family.)
The table has so much nice storage with 4 big baskets, plus adjustable shelves hidden behind the door!

To turn the table from a pretty entry table to a changing table, we just needed to add a really simple wood changing table topper.
Only 2 boards and a handful of cuts made this changing table tray the perfect add-on project — and it can be used as a shadow box display frame, too!

The large tray section fits a changing pad, and the 3 smaller sections on the side fit baby wipes, diapers, and ointment or other diaper changing necessities.
The best part of this DIY changing table topper is that when you make it yourself, it can fit any changing pad or dresser to be both universal and removable.

This post contains affiliate links. Learn more and read our full disclosure policy here.
How to Make a Changing Table Topper
Get the plans to build this changing table topper here as a Remodelaholic newsletter subscriber, or here in the shop.
The printable woodworking plans give all the details and dimensions for building the DIY changing table topper.
It’s designed to fit our cubby shelf changing table and this contoured changing pad, but can easily be adjusted to go on top of a dresser or other piece of furniture.

Materials & Tools
- (2) 1×4 Select Pine Boards*
- (optional) ¼” x 2’ x 4’ plywood project panel
- Miter Saw
- Pin Nail Gun
- Pin Nails
- Wood Glue
- Wood Patch Filler
* You may be able to use less expensive 1″ x 4″ x 8′ furring strips, but check that the boards are all straight and square. The more expensive pine boards will typically be straighter and smoother.
Read our Tips for Choosing Good Boards.
You’ll also need a changing pad. The woodworking plans are designed to perfectly fit this Summer Infant 4-sided contoured changing pad (32 ½” x 16 ½”).
We like this changing pad for the 4-sided contour to protect ever-growing and kicking baby legs from bumping the wood dividers (and it’s held up great for 2+ years).

You could also use these similar sized changing pads:

- 3-sided changing pad from Target
- 2-sided contoured diaper changing pad from Amazon
- 2-sided contoured changing pad from Walmart
- 4-sided contoured changing pad from Bed Bath & Beyond
It’s also really easy to adjust the dimensions of the changing table topper tray to fit the changing pad and/or dresser you’ll be using.
IMPORTANT: With any changing table, never leave the baby alone or unattended. The changing table topper must be secured to the dresser or furniture, and the dresser should be secured to the wall as well to prevent tipping. Just be smart and enjoy this option for changing a baby. We have used this for years and love it.
Assembly Instructions
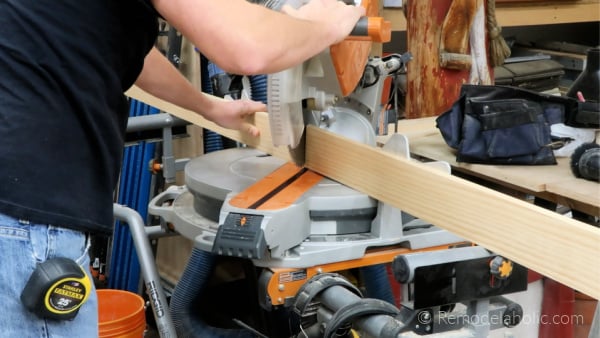
1. Cut the changing table topper sides to length. We mitered the ends of the boards at 45° to create a nice looking mitered corner. Sand the corners lightly for a tight fit.
The length of the shorter sides should fit the changing pad, plus 1 1/2″ to accommodate the width of the long side boards.
Make sure the dimensions you cut fit safely and securely on the dresser, table, etc.

Our table saw workbench makes an excellent assembly table!
2. Glue and pin nail the sides together to create the changing table topper frame.
- Check the frame for square. You can use a carpenter’s square, or measure the diagonal distances — the distances will be exactly the same when the frame is square.
- Clamp the changing table topper frame as it dries to keep it square. A Corner Clamping Jig is really helpful here.

4. Cut the divider pieces. Our short dividers are 10″ to fit diapers, a container of wipes, etc and to hold the changing pad secure while fitting the full length of our DIY changing table dresser.
Space the short dividers evenly along the long divider, and glue and nail in place. Ours are 5″ between.
Then glue and nail the entire divider section in place.
Be sure to check for square again, to be sure that the changing pad will fit in the tray.

6. Optional – Cut the plywood backing.
This is only needed if you’d like to have a backing on the changing table topper to protect the dresser top or for the changing pad adhesive to stick to (or if you’ll be using it as a shadow box frame display later).
Measure and cut the 1/4″ plywood to size. Glue and nail it on the back of the changing table topper tray.
Now finish it! Once all the glue has dried, fill any visible nail holes or imperfections. Sand and paint or stain to fit your desired style.
Ours was just a clear coat finish to match the entry/changing table.
I also sanded all the edges of the boards to take off the sharp corner.

How to Attach a Changing Pad to a Dresser
Whether you’re using a cubby dresser like ours, a regular dresser with drawers, or another piece of furniture — the changing pad tray and table topper MUST be secured to the furniture.
Luckily, it’s as easy as using a couple of mending plates and screws.
You can use a few smaller 2-hole mending plates, or a couple larger mending plates with a few more screw attachment points.

The mending plate just needs to be long enough to reach the back of the furniture and the side of the wood changing table topper tray.
In at least 2 points along the side of the changing table topper, attach the mending plate using short (1/2″) screws.
Then line it up where you’d like on the dresser or changing table, and use the other screw holes to attach to the furniture.
For optional extra security, you can use non-skid shelf liner or heavy duty adhesive velcro to hold the changing pad in place.

Attach furniture to the wall with furniture straps.
Again — NEVER leave a baby unattended on a changing table!

Here you can see a little bit more of the nursery — which was our older girls’ room and then our office and now the baby’s room!
The built-in IKEA wardrobes have been great storage for all the uses of this room.
Room Sources:
- Changing table + topper: handmade from plans by Remodelaholic 😉
- Curtains: Lush Decor Poppy Garden from Target (or Home Depot or Walmart)
- Cordless Blackout Shades (so amazing for a nursery!): Home Depot
- Crib: similar to this one but we added beadboard – I love this one as well with storage!
- Plush/shag rug: Kristan Solid Shag Rug from Home Depot
- Blue wall color: Sherwin-Williams Dignity Blue (same as our bunk bed playhouse)
- Flooring: Floorte Alto HD Plank in Novara
- Closet: built-in PAX wardrobes w/mirrored doors

More easy nursery decor ideas for your baby:
- Woodland Animals Printable Art Sets (4 seasons + 3 additional backgrounds!)
- Best Baby Decor Ideas for Your Nursery
- All our Best Baby Tips and Ideas

Lorene has been behind the scenes here at Remodelaholic for more than a decade! She believes that planning projects and actually completing them are two different hobbies, but that doesn't stop her from planning at least a dozen projects at any given time. She spends her free time creating memories with her husband and 5 kids, traveling as far as she can afford, and partaking of books in any form available.


