DIY Pocket Door Installation


Follow this DIY pocket door installation guide to learn how to hang a pocket door on the track inside a frame, plus our special tool for lifting the pocket door into place.
Read more about how to install a pocket door frame and watch the full pocket door frame install video tutorial here.

DIY Pocket Door Installation
We love pocket doors to save floor space in tight areas, small rooms where every square foot counts like
- bathrooms
- closets
- pantries
- or laundry rooms.
Installing a pocket door system allows more space in the room and in the hallway (and space for things like our bathroom built-ins!).
We figure we regain 8-10 square feet of floor space by removing the swinging door and installing a pocket door.
Read our overview of the pocket door install process (from one of our first houses!) and then we have a more recent video that details the process of installing the pocket door frame.
The expense, labor, and time involved are more than made up for by the added function and saved square feet of floor space!
This post contains affiliate links. Learn more and read our full disclosure policy here.
There are few steps in the process of a pocket door installation:
- Remove the door and hinges, and remove the door jamb (door frame and trim).
- Carefully remove the drywall around sides of the wall around the door opening.*
- Remove the wall studs or other framing lumber that is in the area where the pocket door frame will go.**
- Install a new header the length of the pocket door frame, in the opening you just created.
- Install the pocket door frame kit.
- Reinstall the drywall (and tape, mud, etc) — taking care that the drywall screws are the correct length.
- Install the pocket door hardware and hang the door. (This is the step we’re focusing on today.)
- Reinstall the door jambs (door frame and trim) and install the pocket door guides.
- Install the pocket door handles and latch.
*Before beginning any pocket door or drywall work, think where the plumbing might be, and use a voltage tester to check for the electrical wires around the door frame — very important safety step!
**You’ll also want to use a stud finder to check where your studs and framing are located, to know the scope of the project before you start. You also need to know if the wall space is a load-bearing wall or not.
If you are unsure or uncomfortable working with the electrical components or the needed framing, consult a professional electrician or structural engineer.
Our pocket door install video shows how we installed a pocket door frame kit (steps 1-6) for our Jordan House bathroom.
Today we’re showing you how we put the door on the track for another pocket door in our Birch House basement (step 7).
We are installing a new solid wood flat panel door on this 32-inch pocket door frame we bought at Home Depot. (The width of your pocket door frame depends on the width of your door frame, but this a pretty standard size door height and width.)
See more: Hanging Solid Wood Panel Doors in the Basement
We’ll have another video coming up about installing the pocket door handle and latch, so be sure to subscribe here and let us know what questions you have about pocket doors!
Want the floor space savings of a pocket door without needing to install a frame in the wall? Rolling barn doors are a great option (and they don’t have to look like a barn!). See our picks for barn doors and hardware.
Pocket Door Frame Kit & Hardware
Your pocket door installation kit will come with both the frame to install in the wall (see how here) and the hardware needed to hang the pocket door on the track.
The pieces may vary a bit between manufacturers, but our pocket door kit contains these pieces:

- Angled wrench, specific for pocket door hardware
- 4 long screws
- 2 short screws
- 2 clip-in brackets (to be mounted on the door)
- 2 plastic pocket door guides (for the bottom of the door frame)
- 2 rolling door hardware brackets with 3 wheels each

Step-by-Step Pocket Door Installation Instructions
After you’ve installed the pocket door frame and reinstalled the drywall, you’re ready to hang the door on the pocket door track sytem!
This is a brand new door, but the steps are the same whether you’re using your existing door or a new door.
Step 1: Attach the Clip-In Bracket Hardware to the Top of Door

Measure and mark the center of the top of the door at the correct hardware location.
Be sure to read your manufacturer instructions because this may vary a bit, but generally it’s centered on the door a few inches in from the sides of the door.

Use the provided screws to attach the clip-in bracket hardware to the top of the pocket door.
Pay attention to the direction of the pivoting clip so it’s oriented correctly to make it easy to install.
Step 2: Install Rolling Door Hardware on the Track
As shown in the video, you want to make sure that you have the rolling door hardware wheels turned opposite each other.
One set of wheels has the 2-wheels side on one side of the track, and the other set of wheels has the 2-wheel side on the other track.

A common complaint of older pocket doors is that they can come off the track — and this hardware setup helps fix that problem by making it a more secure and stable connection on the track.
Roll the hardware into the track.

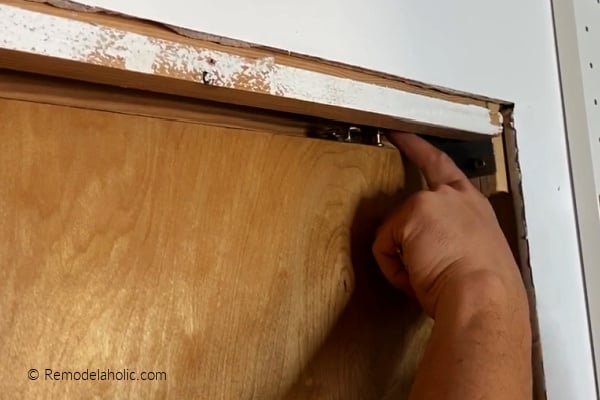
Step 3: Clip The Pocket Door Bracket into the Rolling Door Hardware
Now it’s time to clip the pocket door bracket to the wheels that are in the track.
If you have an extra friend on hand to help, this part of the job goes much more easily.
If you don’t have a buddy to help (or if your buddy is also your camera operator, like in our video) — here’s my secret weapon for doing the job solo!
I’ve had this Pocket Kicker drywall lifter tool for years and used it many times as I’ve been working on our basement and other projects on my own.
(You can get similar mini drywall lifter tools online or at Home Depot or Lowe’s, or any hardware store.)

A drywall kicker like this also great tool for lifting a pocket door into place while you clip it in the rolling door hardware!
Our doors are solid wood and heavy, so this little tool made it so much easier.

How to Lift a Pocket Door to Hang on the Track and Rollers
- Position the pocket door under the track.
- Slide the lifter tool underneath the edge of the door at the side closest to the wall opening.
- Use your foot to lever the tool and lift the pocket door the few extra inches to meet up with the hardware in the track.
- Insert the knob part of the roller hardware into the bracket on the door. The provided wrench is helpful for getting it in the right spot.
- Slide the lever on the pocket door hardware to clip in the rolling hardware. You’ll probably need to use the provided wrench to make sure the latch is closed fully.
Carefully roll the door over a bit, if needed, to position for the other hardware, and repeat to clip in the other bracket.
It takes a little bit of patience and a steady hand is all.
Step 4: Level the Pocket Door
A long 48″ level is a must for any Remodelaholic, and is great for leveling a pocket door.

To make adjustments to the pocket door for level, you’ll just use the angled wrench to adjust the hardware up or down until it’s level, as shown in the video.
What’s Next: Pocket Door Handle & Latch
To finish out the pocket door system, we need to install the door handles, latch, lock , bumper or door stop. (Video coming, so be sure to subscribe to our channel or to our our email newsletter).
We’ll also re-install all the top and side jambs of the door frame trim as well as the pocket door guides from the kit.
Considering installing a pocket door in your home? Let us know what questions you have — we’d love to help!
You’ll also love these door DIYs:
- DIY Barn Door Baby Gate + Dutch Door
- 26 Tips + How To Paint Interior Doors
- How to Install a Wood Beam Doorway
- 40 Ways to Update Bifold Doors and Flat Doors
- How to Add Glass to a Wood Door or a Hollow Core Door

Lorene has been behind the scenes here at Remodelaholic for more than a decade! She believes that planning projects and actually completing them are two different hobbies, but that doesn't stop her from planning at least a dozen projects at any given time. She spends her free time creating memories with her husband and 5 kids, traveling as far as she can afford, and partaking of books in any form available.


Thanks for this post, because I am hoping to put a pocket door in our very small laundry room. Thanks for all the helpful step by step instructions.
You’re welcome, Ivory!